Published by Jeremy. Last Updated on December 11, 2023.
Disclaimer: This Week in Blogging uses demographic data, email opt-ins, and affiliate links to operate this site. Please review our Terms and Conditions and Privacy Policy.
For the longest time, I hated making Reels and TikToks. Actually, if I am being honest, I would go as far as saying that I hated making all videos for one simple reason- it is incredibly time-consuming.
Where I could edit a photo in just a few seconds using tools like Lightroom, editing video took tens of minutes to hours or even days pending length.
I almost even gave up on producing Instagram Reels because I simply found the in-app editing features to be buggy, glitchy, and not user-friendly and it really did not help my already unmotivated self get into it.
It wasn't until I downloaded CapCut (particularly, CapCut's desktop application) and started messing around with the program that I really began to enjoy making Reels and TikToks.
CapCut truly makes this one easy!
A Quick Walkthrough of the CapCut Desktop App

I should start this review off by stating the obvious- I am a desktop junkie. Any and all forms of editing on the phone, to me, are not intuitive and take far more time than working on a computer with a keyboard and a mouse. As such, this review needs the caveat that I only edit using the desktop version of CapCut out of personal preference.
I want to make this distinction upfront because CapCut also offers a browser-based tool and a phone app for editing. While these are similar to most commentary used below, some of the features simply work best on desktop for me (like cropping video lengths using a mouse over a finger). As such, just keep in mind that some variations do exist despite this tool being available virtually everywhere.
Alright, let's get into it.
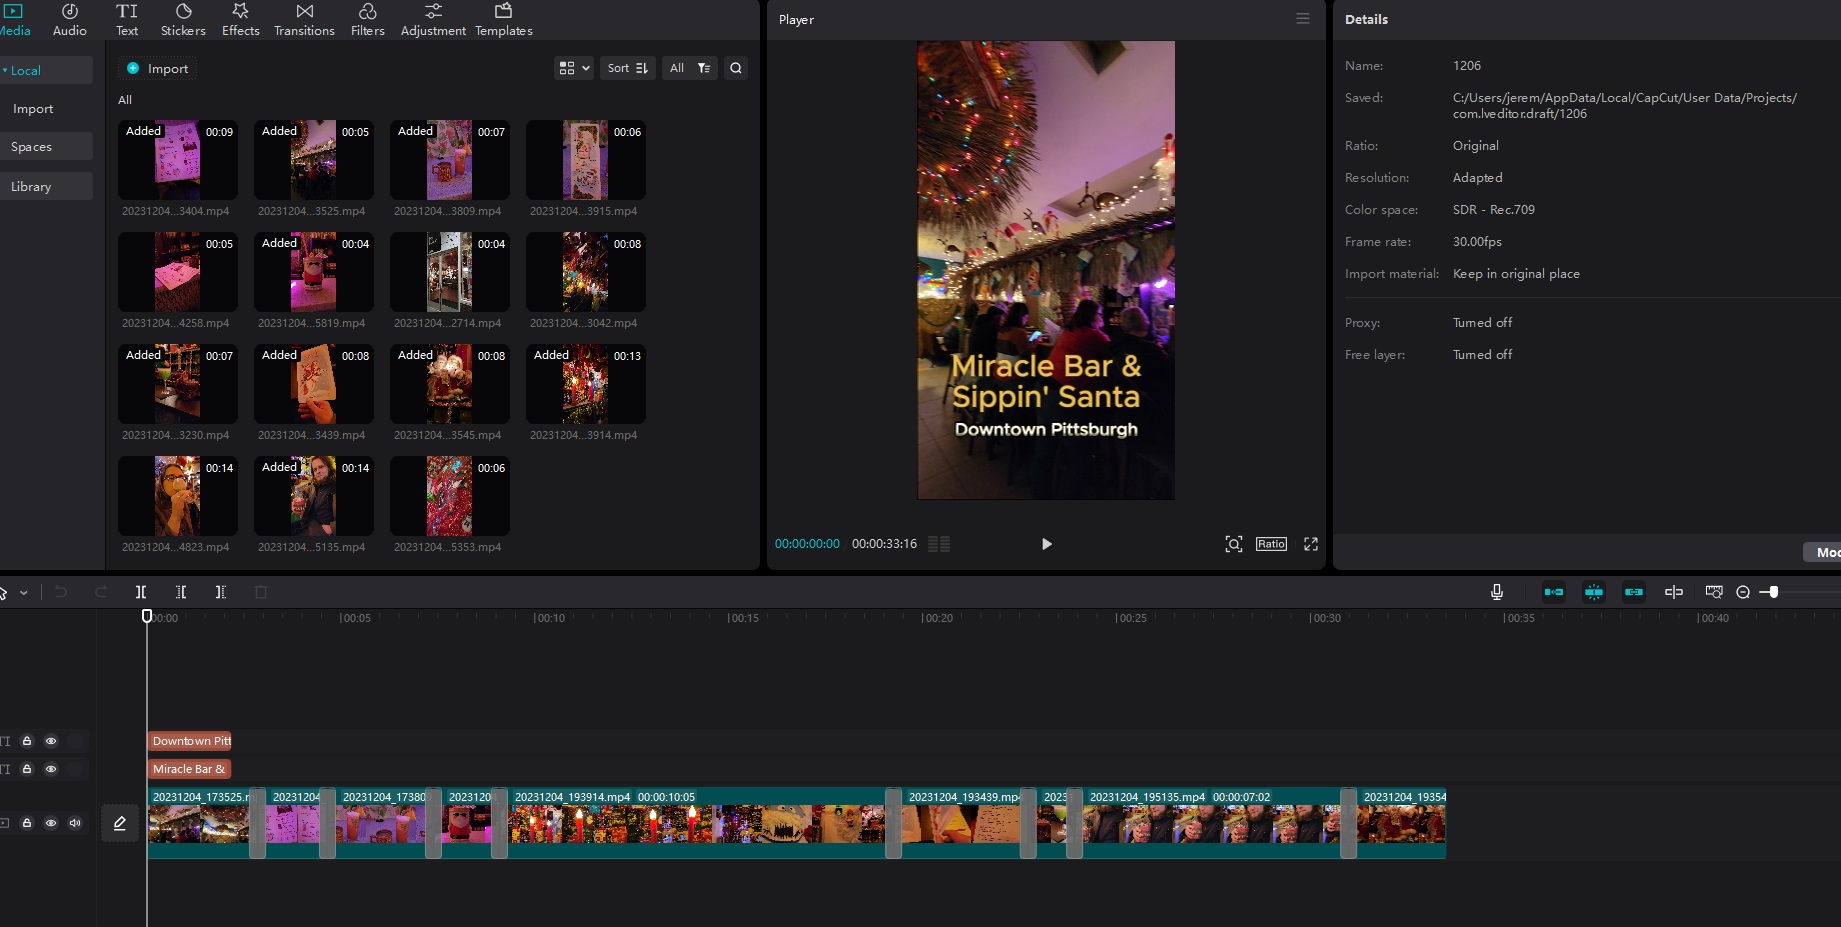
The first thing worth noting about CapCut is that it will automatically save every new video as a project that you can name and modify. These can be accessed in the future, duplicated for future videos (great if you make videos on standard templates), and more. The very first screen you see when loading the program is a list of recently accessed videos, and makes going in and editing additional versions a breeze (a feature we cannot overstate when working on sponsored campaigns with revisions).
The main editing screen will feel somewhat familiar for those who use other premium video editing tools. The top menu bar features common editing functions you may like to use like adding audio, text, stickers, effects, transitions, and more.
Directly below that in the top left of the program is an import button to add video and images to your current project. To the right of that is a Player screen where you can play through individual clips in the import section or your final product, depending on what you select. The bottom half of the screen is a build-your-own video section where you can drag video clips from the import section, add text effects or stickers as layers, and more or less do all your editing as you go.
My CapCut Video Creation Process

The steps I use to make videos in CapCut are simple.
Before doing anything, if you are exporting for a video format that is not the same dimension as your video (say, Instagram Reels or TikTok dimensions), you need to change the Ratio of your project. This can be done using the Ratio button below the Preview tool. This may also need to be done once more at export as well. Thankfully, readjusting aspect ratios is a breeze in case you miss something.
First, I import all my video clips, and occasionally some still images, using the import button in the top left corner. If you have a folder open with all the media in it, you can also drag and drop into this space as well.
Second, once all the video clips have been imported, I drag all of the video/image elements to the bottom section of the screen where they will appear one by one horizontally. A total video duration bar will appear above the video elements as well.
Third, I will go through and reduce the audio on every video element to zero just to ensure no background audio appears in the final product (optional). This can be achieved by dragging the audio bar (visible below the video previews on the horizontal bars) down to the very bottom- effectively setting sound at zero for each individual clip.
Fourth, click the first video and play on the top center player box. As you watch your videos, reorganize as needed for your desired final product by grabbing any video element, dragging it left or right, and dropping it into the spot you want.

Fifth, to cut videos shorter, use the split tool located on the narrow bar between the preview area at the bottom and the import box at the top. Options exist to cut everything to the left, cut everything to the right, or do a traditional split (the three buttons look like variants of ][ in the program). Cut off ends that are a bit too jittery from starting your camera or simply crop a video down as needed. To remove an element, assuming it has been cut on both sides, simply click delete and it'll disappear (and if you delete a video by accident, simply click Ctrl+Z to undo and bring it back).

Sixth, if any video needs more technical editing, like color, brightness, etc., make those in the Adjustment tab for any clip. Simply click the clip segment you want to edit, go to the Adjustment tab, and then the “Details” screen in the top right will open up new edit settings for you to work with for any given element. Repeat as needed. This isn't the most robust suite of editing tools, I will admit, but for quick productions, it does the job well enough.
- My most used adjustment here is editing a video clip for speed. Slow-moving clips at 1.5x, 2x, or faster sometimes look quite nice, and high-resolution videos slowed down to 0.1x, 0.5x can look pretty cool in slow-motion, too!

Seventh, at this point you likely have worked your way through your video enough to have a functional, albeit silent, product. Now it is time to add effects! Go to the top of your screen and work through any of the desired categories you wish to add to your video, be it text, stickers, effects, transitions, and more. Clicking one once will typically show a preview in the Player section of the screen, and to download them into the video you need to click the download button at the bottom right of any given element box (it looks like a down arrow pointing to a horizontal line).
When you do this, a new layer is created in the edit area above the video. These elements can be made wider (longer), narrower (shorter), and, much like with the Adjustments tab, more editing features will appear in the “Details” area in the top right. Likewise, the element will also be visible on the Player screen in the top center, and you can move any given element around or resize it to your preference. Repeat as needed until all of your elements are present.

Eighth, watch your video in full and see how it plays, making careful note of total run time if you have a limit for your preferred service and that you haven't missed anything like a transition between two clips, cropping a subtle camera movement, and more.
Finally, you're ready to export! Go to the Export button in the top right of the screen, select your preferred Title and export location, and adjust your video specs like Resolution, Codec, and Format accordingly. If you are going high resolution, you can adjust the framerate too, but for most videos I am cautious of file size and simply export at 1080P at 30 FPS in mp4.
That's it! Now you can either move your video back to your phone to upload directly from there, via a web-based app from your computer, or, in some cases, directly via CapCut (primarily TikTok in this instance)!
While this one may sound like a lot, with a bit of practice, I have been able to get simple video edits down to less than 10 minutes from import to export. Now that is an efficiency I never quite reached with other editing softwares!
- A note on audio: One interesting feature of CapCut is that you can add TikTok audio straight into your video. I generally only advise doing this to see how a preferred audio clip will sync up with video length and not to include it in a final export. Social networks are notoriously picky on any external audio possibly violating copyrights, and to minimize any risk, I almost always add music directly in the app as opposed to overlaying sound through any 3rd party service. This is purely a risk management thing even if, in most cases at least, it may not be a problem. Why tempt fate when it only takes a few extra clicks in the app, right?
Do You Need CapCut Pro?
For those who download the free CapCut app, you'll note that there are numerous buttons prompting you to “Join Pro” throughout the program. But do you need another subscription to use this service?
The answer is, thankfully, no.
In my experience using CapCut, many of the Pro elements that are locked behind the paywall are simply more customization functions in the form of text fonts, text effects, video effects, transitions, and more. I would argue that at least 50% of any given element/technique is available for free, and the program itself functions perfectly well without any hindrance without having Pro tools.
Is it worth it to you to get more fonts, transition effects, or stickers? Well, I can't answer that question for you- there could be a very specific feature locked behind Pro you want that could justify the cost well enough. But for me as a passive user who only is doing this because video is trendy (and not because I'm really making that much money from video at this time), I have not found the need just yet.
But if my situation were to change and I needed to produce more elaborate videos for reasons I cannot predict just yet, a subscription to CapCut Pro is indeed a small price to pay- even if I, by a rule, generally do not like the subscription model kind of service (if I could buy a lifetime license for a couple hundred dollars, I would in a heartbeat to tip the programmers, however).
Do you have any tricks you use to edit in CapCut? Comment below to share!
Join This Week in Blogging Today
Join This Week in Blogging to receive our newsletter with blogging news, expert tips and advice, product reviews, giveaways, and more. New editions each Tuesday!
Can't wait til Tuesday? Check out our Latest Edition here!


Upgrade Your Blog to Improve Performance


Check out more of our favorite blogging products and services we use to run our sites at the previous link!
How to Build a Better Blog
Looking for advice on how to improve your blog? We've got a number of articles around site optimization, SEO, and more that you may find valuable. Check out some of the following!


Great breakdown of the CapCut process! I’m curious about the audio aspect you mentioned. Have you found any cool workarounds or creative ways to incorporate audio without running into copyright issues? Also, love the heads up about adding TikTok audio directly in the app – super useful tip!
I can’t say I have any foolproof way to do it, but I know on Facebook they have a collection of royalty free audio clips in the Sound Collection. I would search that specifically, especially for sponsored videos or if you are in the Ads on Reels program, to ensure you dont have any issues. TikTok I am less sure of, but it seems like they don’t have as much popular music so I am not sure how big of risk it is there.
Great review! I completely relate to the struggle of making Reels and TikToks because of how time-consuming video editing can be. CapCut’s desktop app sounds like a game-changer, especially with features like automatic saving, easy import, and intuitive editing tools. The ability to adjust audio, use various effects, and quickly export videos makes it even better. It’s also nice to know that the free version offers a lot without needing to go Pro. Thanks for the detailed walkthrough and tips!
CapCut used to be great but now majority of features are paid