Published by Jeremy. Last Updated on November 2, 2022.
Disclaimer: This Week in Blogging uses demographic data, email opt-ins, and affiliate links to operate this site. Please review our Terms and Conditions and Privacy Policy.
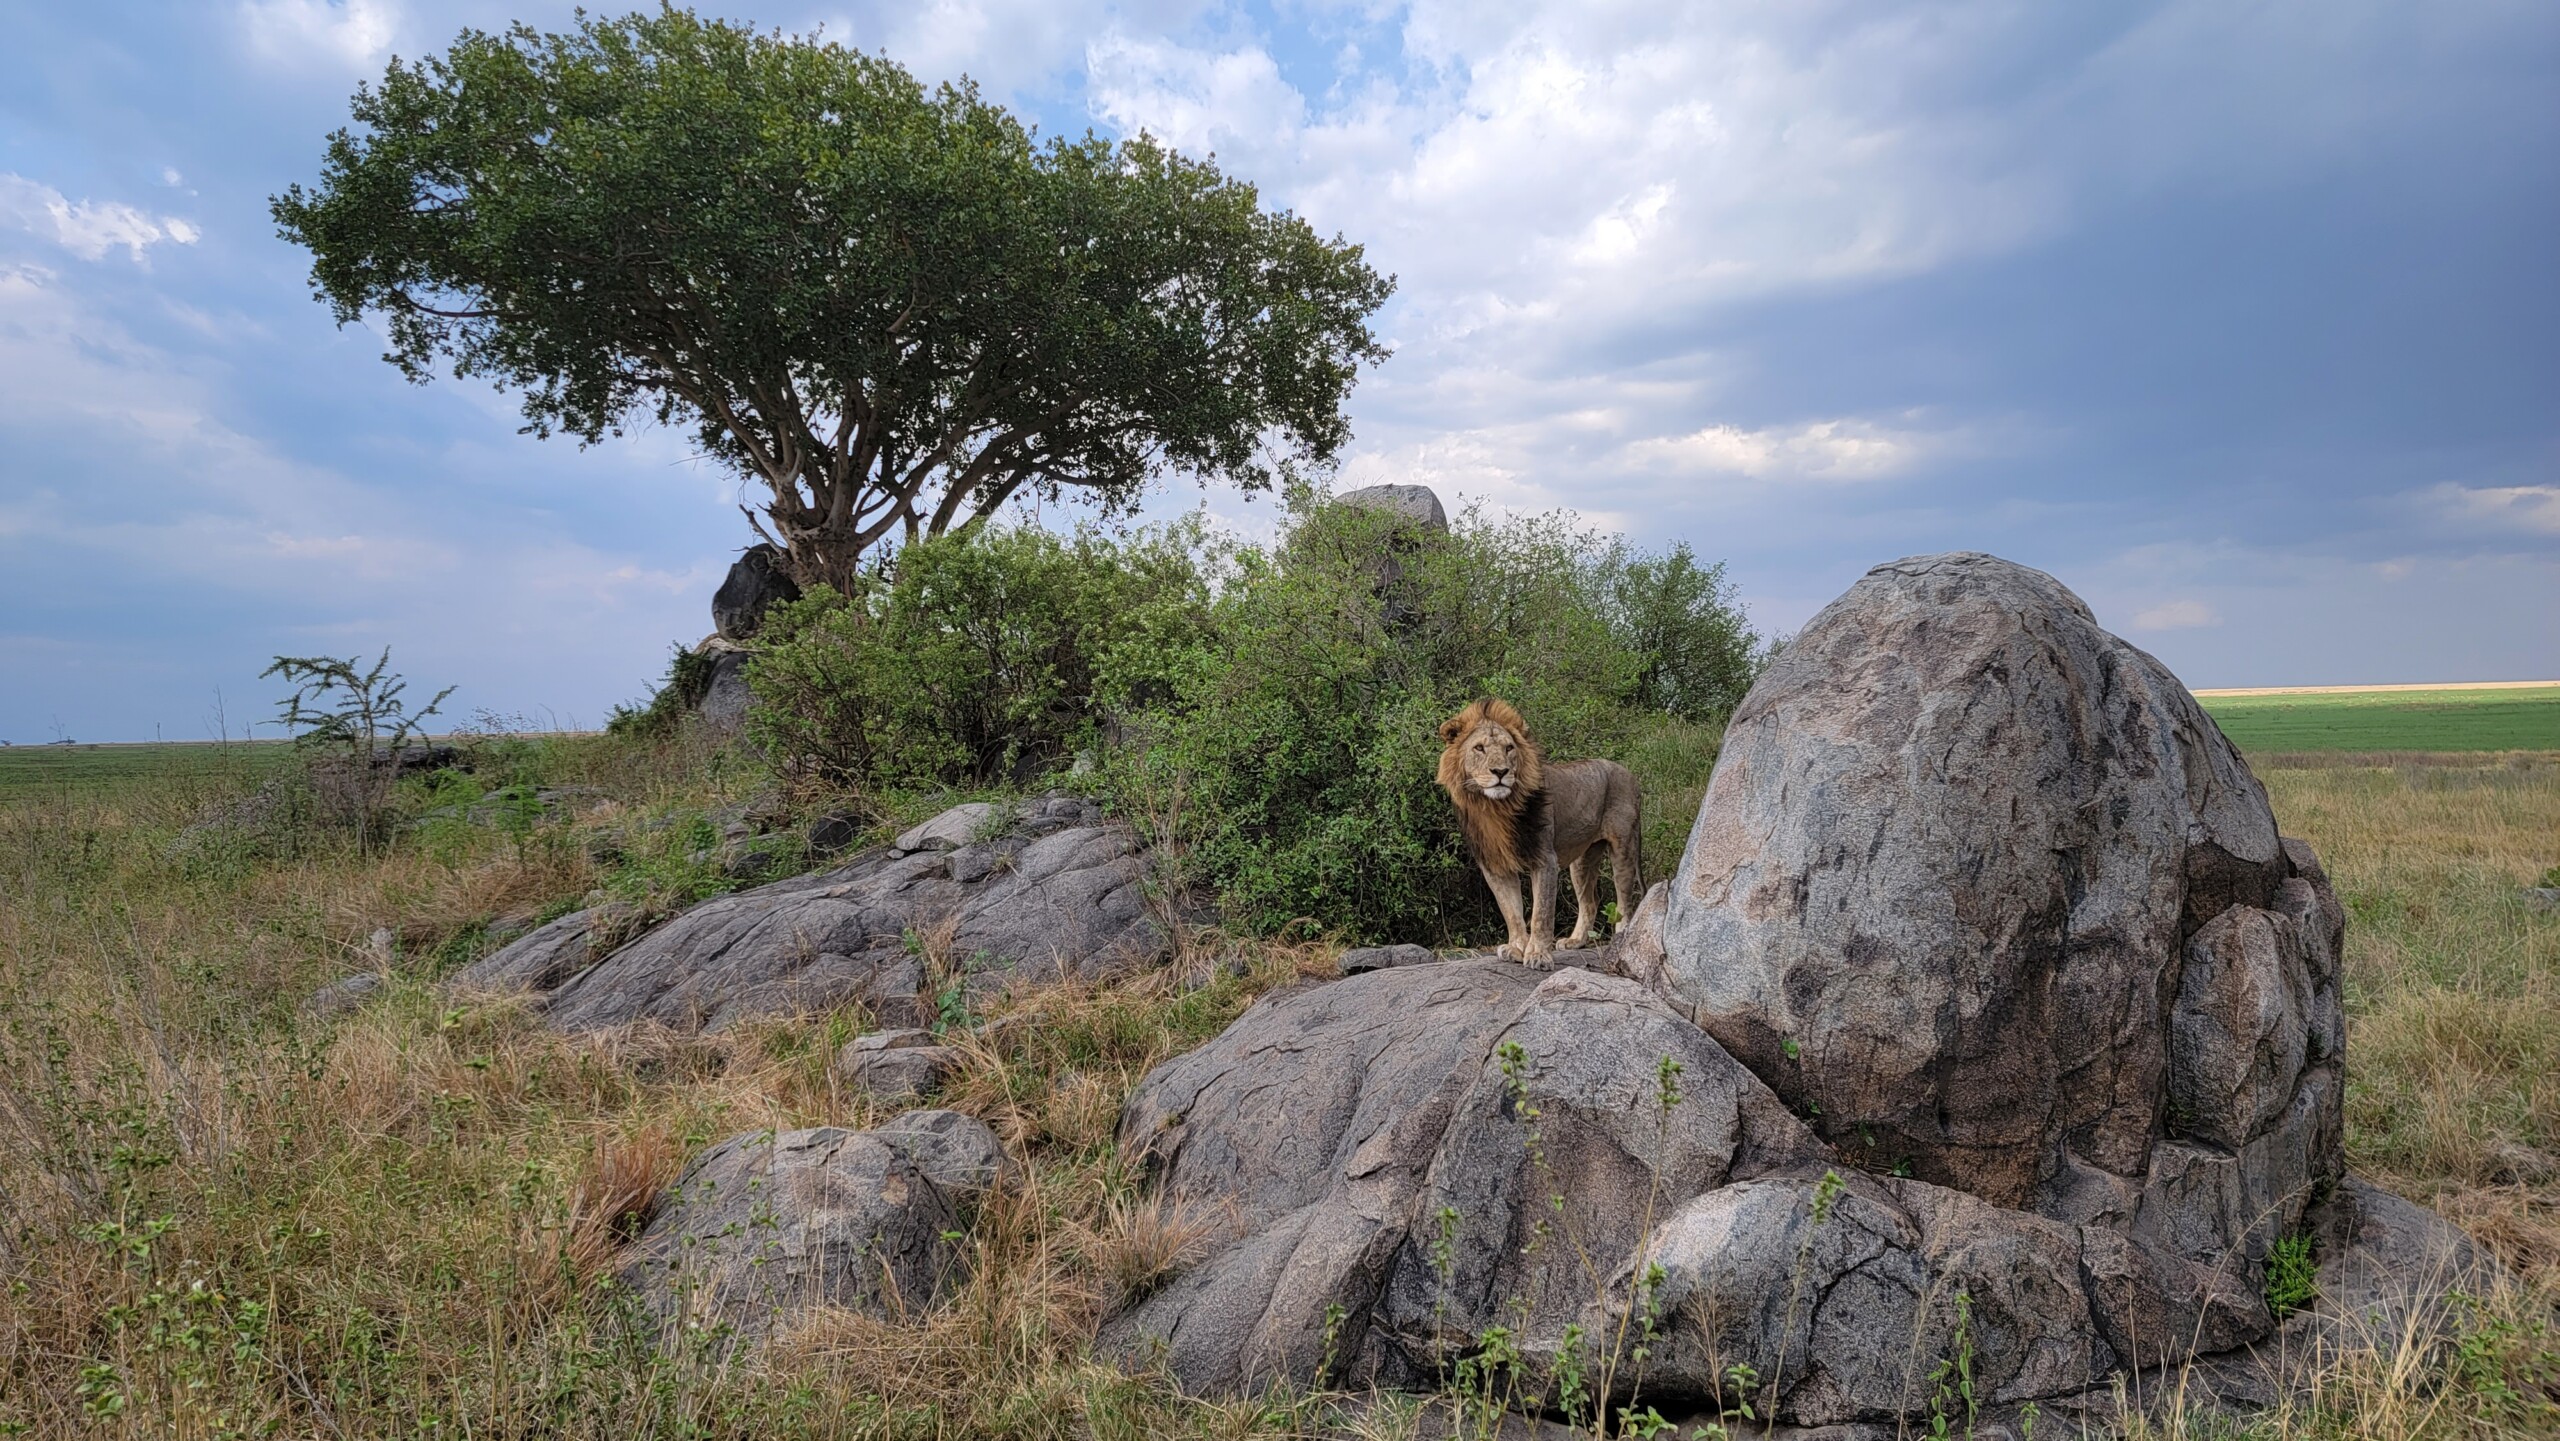
When I went on safari in Africa, I got a wealth of amazing photos with my rather expensive mirrorless camera and telephoto lens.
But perhaps the best photo of the ~10,000 shots my wife and I took was not on my professional camera, but rather on my cell phone. This shot could only have been taken on my phone as the subject of the shot, a lion standing on a rock a la the Lion King, was so close to our vehicle that my 150-600mm camera lens was far too tight to do the full scene justice (even the 50mm lens on my wife's camera was not wide enough as well).
But there was one problem- my phone's camera wasn't in the best mode when I got this shot.
Instead of being on the 104 MP camera mode, I was set on a ~9 MP camera setting as I played around with other modes before coming into this quick scene. The photo looks great even at this lower resolution, don't get me wrong, but when it comes to blowing up the image to larger file size for print, it wasn't perfect the way a 104 MP shot would've been.
So I wondered, can upscaling AI help me get a better photo after the fact, ultimately to print a larger photo for my house? This seemed like a great opportunity to test out several services!
Note: Side-by-side images used within the article may not be perfect overlaps. That being said, visible improvements (or lack thereof) are reflective of the final results even if the exact level of zoom is not perfect.
What Does Upscaling AI Do for Images?

Upscaling AI can take on several meanings depending on the company you are looking at (and whatever colorful language they throw into their marketing). But at its core, it is using artificial intelligence to predict what a higher resolution photo may look like from a current, “downgraded” image.
You are likely already familiar with the reverse when you edit photos. If you export images to lower resolutions (as we always recommend for web use), your given software reduces the effective MP of an image, perhaps scales back the DPI, compresses the file, and more, all in an attempt to “downgrade” the image into a smaller file size. These images will still look great at, say, 1200 px wide for web use, but would not look great blown back up to their original dimensions.
When you have ample pixels to spare, downgrading is easy. Upscaling, the reverse, is far more difficult- AI looks at the existing image as the “downgraded” file, and the software attempts to recreate what the higher-resolution image would have looked like.
While this tech feels like it is somewhat in its infancy for independent photographers, you likely see it in action every day when watching high-resolution TV. In many cases, your TV takes a lower-resolution video file and upscales it into a high-resolution format upon demand. Although the mechanisms are likely different, the overall idea is similar- computing takes a lower-resolution file and transforms it into something much, much better.
So, why would you need this as a feature in editing software? Read on.
But Why Would Bloggers Need Image Upscaling?
Ultimately, while businesses that sell AI image upscaling products may try to sell you on any number of factors, in my opinion there are two reasons why you may want to give image upscaling a try.
First, as per my case above, you want to blow up an image to a size larger than its current resolution allows. Bloggers tend to stick to the downgraded format for web use (all my web photos are exported at 2000px wide and not terribly high resolution to be just a couple hundred kb in size), but if you are selling an image for large format print or want a larger printed photo at home to enjoy close-up, these tools can help add a bit of resolution to get you there.
Second, it is simply for restoring some sharpness to otherwise fuzzy photos. In this case, AI can likely add some granularity to images that weren't purely in focus as was the case of many, many of my safari shots. This is really just a tangent of the first point, but you may just have a drive for sharpness over increasing image size (or vice versa), and AI may help fix this to a degree. Again, probably not a big issue for those who primarily share photography on the internet as the degree of sharpness is mostly noticeable in larger formats, but it is an option all the same.
While there may be other scenarios where AI can improve images, these are two of the most important to me as they simply go beyond conventional editing tools, which for web use are good enough for me 99.9998% of the time (out of the ~500,000 photos I've taken in my life, this is the first time I've looked into services like these and only for this one particular image).
- If you have an image that has great sharpness and you only want to enlarge it, you fall into the first case above. If you want to improve sharpness along with it, you fit into both cases. This test was to see if services can satisfy both requirements, but we will note what programs can achieve the first one alone if you have a sharp photo all around.
Test Results from Five Image AI Services
For this test, I looked at five of the major image upscaling products to see if any could improve my image and, if so, by how much.
The services I looked at were Adobe Lightroom, Adobe Photoshop, Gimp, Vance AI, and Gigapixel AI- five of the most well-regarded programs for photo editing and/or AI integration.
Lightroom

Cost: ~$10/mo for Adobe Creative Suite
Method: Right-click an image and use the “Enhance” feature in tandem with other editing.
Testing this one in Lightroom is quite simple, as the Enhance feature is built right into the tools. It is just a bit hidden as you access it via right clicking your image, tapping Enhance, and confirming the settings.
Ultimately, I don't think the Enhance tool on this service did much at all that other in-app tools (like sharpening or clarity) would already improve upon. No matter how often I tried this one, whatever benefit I got out of Enhance was almost non-detectable, and the image itself was never properly upsized per pixel dimensions. I later found out you can adjust the size and DPI in export settings, but even when correcting for this, the quality change was minimal to my eyes.
Verdict: If you like the quality of your image as it was shot and simply want it larger, Lightroom may work decently enough. If you want to improve resolution / fix some sharpness faults along with it, your mileage may vary.
Photoshop

Cost: ~$10/mo for Adobe Creative Suite
Method: Resize the Image under Image -> Image Size and add sharpening via Filter -> Sharpening. You can also adjust some other filters in layering or “Enhance” per the above in Raw or Adobe Bridge.
Photoshop's Enhance feature is, in all honesty, not much different than the one packaged directly into Lightroom. No matter what I tried, the image itself here did not seem to have notable improvement. Attempting secondary adjustments for resizing the image and adjusting sharpening and noise reduction in layers more or less netted the same effect as Lightroom but in several more steps.
Verdict: If you like the quality of your image as it was shot and simply want it larger, Photoshop may work decently enough much like Lightroom (I feel like I had slightly better results with Photoshop here but that could be a setting variance). If you want to improve resolution / fix some sharpness faults along with it, your mileage may vary.
Gimp

Cost: Free
Method: Scale image under the Image dropdown and Sharpen under Filters, Enhance.
Gimp is a free image editing tool that I used before committing to paying for Lightroom and other tools on this list. The program has a wealth of editing options for users but, admittedly, has a fairly steep learning curve as some of the features are not intuitive (it reminds me a lot of Photoshop in this fashion).
For scaling images and sharpening, you will use the Image and Filters drop-down menus (plus the sub-menus of Scale and Filters->Enhance accordingly) and then export an image once optimized. One of the cool things about the Enhance tool is you can turn on a before and after slider to see how much your degree of sharpening impacts the image before applying it.
Overall, while the program did quite a good job at upscaling the image size in terms of pixel dimensions, I'm not sure it did much to enhance the resolution at all after that was completed. That being said, there are several cool filter options on this one that did improve the overall look of my image- just not to the degree of enhancement I was hoping for. So this one has a slight edge over Adobe's tools, but only by the littlest margin possible.
Verdict: Gimp has a nominal improvement over Adobe, particularly in the sharpening/resolution department. But all three services worked equally in upscaling an image on size alone.
Vance AI

Cost: Variable for “credits” starting at $4.95/month for 100 exports.
Method: Upload to a web portal and select from an array of options.
Vance AI offers a rather straightforward web interface. All you have to do is upload an image, select the feature you want to use (Enhancer, Denoiser, Upscaler, Sharpener, etc.), pick an AI model within that category, adjust a few parameters (such as 2x, 4x, or 8x for Upscaler), and click process.
For this test, I looked at the Upscaler feature with trial credits. Here, I was shocked at just how well this one performed as the resolution was pretty darn impressive even at 8x. Yes, this one filled in some pixels with obvious faults (the lion's eye, for example, is darker than the original implied it should be), but I would 100% be happy printing this photo all the same. Other exports in Enhancer and Denoiser seemed to have some improvements on the base image, but it didn't seem like the portal liked to work with upscaled images re-uploaded (perhaps due to size, or perhaps due to user error- maybe both).
So while you don't have a lot of control in terms of settings/adjustments, and maybe have to be a little strategic in using passes of multiple AI tools (i.e. Enhancer before Upscaler), the results here speak for themselves in this test on the Upscaler tool alone.
The pricing for Vance AI is a bit weird, however. Although the service charges a fee for credits (and most optimizations “cost” one or two credits per output), it is actually a recurring monthly charge. There are also max limits on how many you can roll over at any given month (5x your subscription total), and credits do expire at the end of the next subscription period if you cancel your account (i.e. what would've been your next billing date).
So for infrequent users, you may want to build up a collection of photos you want to edit, pay for a month of [X] credits, edit in bulk, then cancel to avoid a recurring fee. While I wish I could just pay for non-expiring credits in a one-time fee, the price point is still attractive here insofar as you pay attention to billing.
Verdict: Excellent for both upsizing and increasing sharpness/clarity in the image, but a weird pricing model due to the subscription format.
Gigapixel AI
Cost: One-time purchase price of $99.99 for Gigapixel or $199.99 for the suite of products
Method: Upload to the program on your desktop and choose upscaling size, model, and any enhancements.
Gigapixel AI is a relatively straightforward desktop program where you upload an image (a la Lightroom, Photoshop, etc.) and enhance it via a handful of upscale models and sizes (up to 8x). The service has an automatic option where it will try to select the best cases for your image; however, I've found that testing these out manually by hand is the best- if only because the preview automatically updates at every setting change.
The resulting image from Gigapixel AI was, in all honesty, quite good at 6x size. I would say that some of the photo's sharpness was not quite as nice as what came out of Vance AI, but if you purchase the suite of products you'll also get access to the Denoise and Sharpen AI tools which can further improve an image in just a few more clicks (visible below). When applying these, I got a closer match to the original image (no darkening of the lion's eye for example), but overall was perhaps just a step below Vance's Upscaler output for this image all the same.
Pricing here is a bit more straightforward, as the products can be downloaded for a one-time fee. I opted just to buy the suite, but you would likely need to use these programs a lot to justify the cost.
Verdict: An excellent option for upsizing and sharpening enhancements for those who do this kind of editing regularly and want a bit more control in settings. The one-time fee may be offputting for casual users.
The Winner? Both AI Services By a Mile
After testing all of these tools, I was pleasantly surprised by how well the AI programs did over their more traditional image-processing counterparts. I would go as far as saying that I liked the output from Vance AI in this particular case more, but they're honestly so close that it could be within a “your mileage may vary” range depending on the image you want to process. This test was only on one image, after all.
Yes, most tools were pretty good at upscaling images to larger pixel dimensions. But it was only the AI software that was able to also sharpen the images enough to improve the appearance and higher DPI as well. Were they perfect? No. I saw some faults in the image I chose to test with both services. But these were definitely only noticeable to me and, in particular, when compared to the original image outright. If I were to only have shown you the post-AI image, well, you wouldn't be any the wiser that these were processed in such a fashion.
As such, your selection of a program can vary. If you are happy with the quality of your image as taken, and simply want to make it larger, all products work just fine for that. If you think the resolution/sharpness of an image needs improved in addition to upsizing, AI may be a better choice.
So while I would say that Vance AI may win in particular because its credit system makes optimizing images incredibly affordable if you can batch your processing and avoid a monthly fee, if you are looking to do this sort of processing on a bulk scale (think hundreds of images), and perhaps want greater control over the process overall, then paying for a download of Gigapixel AI (and perhaps Topaz Lab's full suite of programs) can be worth the one-time fee. Ultimately, I bought a license for Topaz Lab's products just to add them to my arsenal despite likely only using it on a limited basis- whether I get $200 use out of it remains to be seen.
But overall, while I still optimize my images in Lightroom the vast majority of the time, it is nice to know tools like these are available for the rare instance I want to go bigger, not smaller and need some sharpness/clarity improvement along with it.
One Final Word of Warning Before Upscaling Images
Before ending this one, it is worth pointing out a third test that I did with these images that I have not mentioned up until this point.
Prior to investigating AI tools to upscale my images, I had, as most photographers do, edited them in Lightroom. I do not engage in heavy editing of my photos and simply opt to fix some contrast, lighting concerns, color corrections, and, for slightly off photos, enhance the sharpness or add noise reduction as well (all common adjustments in the world of photography).
These, particularly the latter sharpening/noise elements, became significantly embellished when later running through and upscaling AI tool. As these programs often work by adding pixels to sharpen an image and scale, doubling up on this effort via Lightroom and an enhancing tool made the images look worse instead of better. I cannot begin to explain why this may be the case, just that it was something I observed across almost all of the tools mentioned above.
So as a word of caution, I would recommend trying to test upscaling on non-edited images first to get their sharpness and file size corrected and then edit the file in your favorite photo editing software like Lightroom for any other adjustments.
- Whether this observation holds for all edit styles or only the sharpening/noise reduction feature as mentioned above was not tested. Logically, it simply makes sense to generate new pixels first and then edit them via Lightroom as opposed to the other way around. But your mileage may vary here as well.
Have you tried an image upscaling service that you like? Comment below to share! We may test more services to update this article in the future and are always on the lookout for new tools to play with.
Join This Week in Blogging Today
Join This Week in Blogging to receive our newsletter with blogging news, expert tips and advice, product reviews, giveaways, and more. New editions each Tuesday!
Can't wait til Tuesday? Check out our Latest Edition here!


Upgrade Your Blog to Improve Performance


Check out more of our favorite blogging products and services we use to run our sites at the previous link!
How to Build a Better Blog
Looking for advice on how to improve your blog? We've got a number of articles around site optimization, SEO, and more that you may find valuable. Check out some of the following!