Published by Jeremy. Last Updated on January 13, 2021.
Disclaimer: This Week in Blogging uses demographic data, email opt-ins, and affiliate links to operate this site. Please review our Terms and Conditions and Privacy Policy.
When it comes to showing related posts on your WordPress blog, a number of plugins exist that will use proprietary logic in order to display relevant posts at the end of any given article.
Generally speaking, I don't like these. First off is that the level of control you have over what posts are shown varies considerably, and second off those that have built-in display logic can be, at times, slow. The latter may be partly due to bloated scripts, but also because it takes time for the plugin's algorithm to parse your content and return recommended posts.
So what can you do if you want to fix one (or both) of these issues? Well, the way we show relevant content on our sites without interrupting our load times is with a combination of two plugins- WP Show Posts and Ad Inserter.
Today, I wanted to provide a walkthrough of how we do it.
What are WP Show Posts and Ad Inserter?
The two plugins we use to display relevant posts on our site are a lot like what you'd imagine from their names.
WP Show Posts lets you create custom article features based on fixed logic of your choosing. As you set your own rules in creating the related posts boxes, this helps speeds up the process significantly- in my experience at least. We like to create our features based on categories and tags used in articles, but there are a number of sorting logics available both for choosing what article types are shown (categories and tags are just the most common) and how they're organized (most commented on, most recent, random, etc).
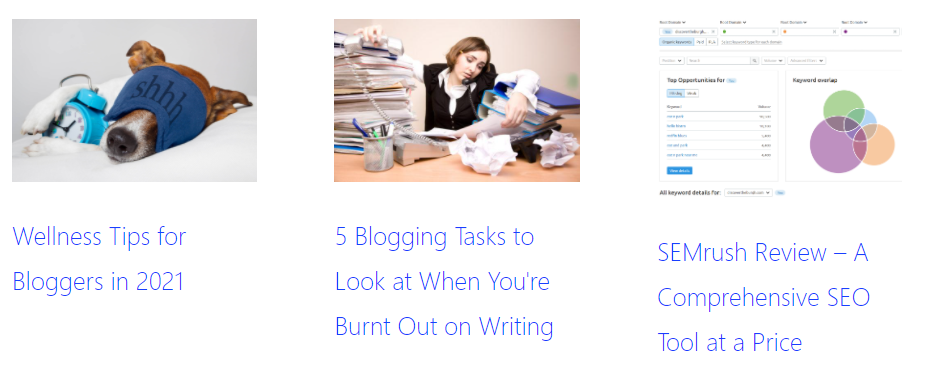
An example of the final product featuring our recent posts is illustrated below:

For each custom prompt you build, WP Show Posts creates a unique shortcode that can be inserted anywhere on your site (so in our backend of this article, the above is simply a shortcode we inserted into the post).
What it does not have is display logic- you have to insert these shortcodes manually on your site for them to be visible.
This is where Ad Inserter comes into play.
As its name suggests, Ad Inserter is a plugin that inserts custom HTML boxes in numerous locations on your site based on its robust logic system that you build out. Originally it was designed for display ads, but it can be used for inserting just about anything almost anywhere on your site insofar as you can get the logic to workout. Our disclaimer at the top of articles? Inserted via Ad Inserter. Widgets on our sidebar? We use Ad Inserter shortcodes inserted in widget boxes. Custom prompts after content? Yep, Ad Inserter can do that too.
But there are two real reasons why we use Ad Inserter specifically:
- AdInserter has an abundance of display logic options built in to show custom content based on categories, tags, and more.
- The premium version, Ad Inserter Pro, also lets you lazy load the code boxes outright.
The former is great for syncing up displays with WP Show Posts based on categories and tags. The latter is great for speed- especially if you are inserting script-based codes like newsletter sign up boxes, maps, responsive affiliate boxes, and more. Many of these often do not let you lazy load them on their own, but we've found that Ad Inserter Pro gets around it by lazy loading the code box outright!
Have a travel blog and want to show related posts from Nepal in your footer? Create a WP Show Posts based on a category or tag of Nepal and use Ad Inserter to only display it on posts containing the category or tag Nepal. Doing this with the “After Content” insertion lets you display custom content unique to Nepal (in this case related posts), but the sky is really the limit from there- we've created customized affiliate prompts on a country-to-country level too!
So, how do you go about doing this? Read on.
WP Show Posts and Ad Inserter Logic

WP Show Posts on its own is rather intuitive. The lefthand column lets you go through and change the settings you'd like to have for each unique display and takes only a few minutes to check it all out.
- Under Posts, you can select whether you want to display posts or pages, the category or tag you'd like to display articles from, and the number of articles you'd like to show on a single page (we generally do three, you can do more).
- Under Columns you space out the format. If you want to display three articles in a single row, select three columns here too. If you selected six in the Posts tab, you'll get two rows of three, for example.
- Under Images, you can set your image alignments, custom widths/heights (we ignore this), and whether you want the title above or below the image.
- Under Content, you can decide whether or not you want to show an excerpt, customized read more text, and more. Meta also allows for showing more metadata as well. We also ignore this.
- Perhaps most interesting is the More Settings tab as here you can exclude individual Post IDs and change the order of your posts as well in categories like date (showing newest to oldest or reverse), author, post type, random display, comment count, or more.
If building a display to show recent posts on all articles, we'd not select any categories/tags under “posts” and go into More Settings and order by date in descending order. If we want to display posts by individual topic, we may pick a display category/tag but select Random in the More Settings tab so the recommended posts change upon each load (WP Show Posts will not show the post a user is currently reading- a bonus!).
When you're done, save and grab a copy of the shortcode. It is time to move to Ad Inserter!

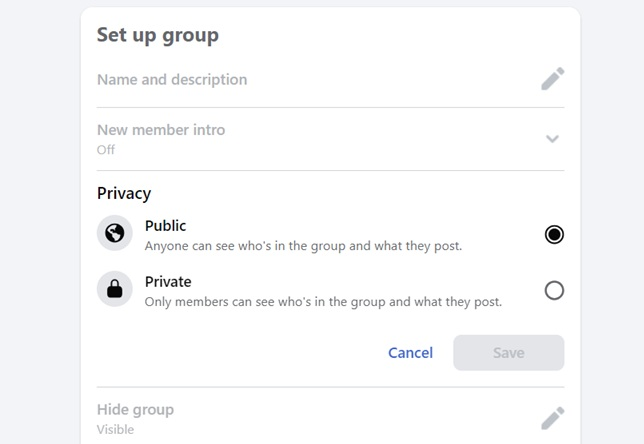
Ad Inserter has a learning curve and is a fair harder- especially if you do more advanced scenarios than what we will discuss here. The above image is a good start for an example and can be expanded by clicking.
The black display box in any given Ad Inserter tab allows for HTML code to be inserted directly. This is the code that will be inserted into your site. Put your WP Display Posts shortcode here as well as any header tags and or text you want (note that we format our paragraphs with a <p></p> bracket as sometimes your blog's paragraph formatting will be ignored otherwise.).
Directly underneath the box are several buttons with the names Lists, Manual, Devices, Misc, and Preview. Click all of these except preview to expand their settings below (some may show as default and clicking them will hide a box, click again and it will reappear).
The first box displayed has checkboxes for whether or not you want the logic to insert on posts, pages, the homepage, and archive pages and you can check these settings accordingly to your specific needs. Many times we think a display is not working and we had simply forgotten to enable one of these.
The next section displayed is the placement logic, and you will want to change the dropdown to be “After Content” here to display at the end of any given article. When you learn more about this program, this section becomes a lot of fun as you can insert “After Paragraph” and specify a number of paragraphs down or a percentage of the way down the page too. But for related posts in this context, we stick to “After Content” only to make things easy.
Controlling this for any given category is where things get tricky. Under the Lists section you can then click the small grey checkbox next to options like Category or Tag (the above image only shows Tags, but when you start a new box many more rows will be available). This opens up a list of your existing categories or tags respectively and you can select which one you want to control the insertion based on. After selecting this, you will need to go over to the X on the right side of that row and click it to toggle to a checkmark. Keeping an X should result in a display on all posts EXCEPT the category or tag selected, while a checkmark should show the code ONLY on posts with the category or tag selected. This is pretty handy!
Generally speaking, I do not like to mix different options here when it comes to insertions (say, show X category AND exclude Y tag or show A tag AND exclude B page IDs). I've found that I can often get Ad Inserter to work displaying one box multiple tags in a single line item (show on tags 1, 2, and 3), but combining multiple rows here often does not work out so well.
You'll have the best luck if you are streamlined when creating display rules here, but your mileage may vary.
Other tabs of note include the Manual tab (allows you to insert a box as shortcode, say in a widget or on an individual post- we do this on our homepage but note you need to check the homepage box in the top setting!) and Devices (where you can control displays based on mobile, tablet, and desktop- great for customized affiliate banners that are not responsive). If you ignore these, it should display on all devices in all cases as default but it is worth remembering in case you forget a setting was enabled when you make changes in the future- we've been there.
The Misc. tab is important to note for those who have the Pro version of Ad Inserter as you can go to the Display sub-tab here and enable Lazy Load to prevent the code from being loaded until a user scrolls close to it. This is a great option for deferring scripts that otherwise take a while to load and can help significantly with load times- although in my experience is not necessary with WP Show Posts insofar as you lazy load images as default anyway. There are more display settings here as well for advanced users worth checking out.
Save your settings and it is time to check your work! Open a post with the category or tag you built your display on (and check posts without those categories and/or tags to ensure it is not displaying) and see if your display is working. If it is, great- and you can move on to the next one! If not, you may need to troubleshoot some of the above cases a bit more.
For those, we have a few more things you may want to keep in mind.
Other Concerns to Keep in Mind
Overall, this process is somewhat labor-intensive, I will admit, but is incredibly helpful in providing display logic that is the most relevant to your users and fast (my favorite part).
There are a few caveats worth noting that I would like to end this guide on:
- You have 96 blocks in Ad Inserter so use them wisely. You can toggle to more boxes in the upper right corner of the screen just above the HTML box (the button looks like four little squares stacked two by two).
- As mentioned above, I find that multiple “List” display rules in a single Ad Inserter box (via categories/tags/etc) often confuses the plugin. For any given HTML box, it is best to pick just one display logic to make your settings easier. The logic system is powerful, but not that powerful.
- For example, if you have the category Asia and the tag Nepal, don't try and force display logic on both in a single box. Create separate displays for the two if you want unique content to show respectively.
- AdInserter has no logic to limit displays of multiple HTML boxes in any given insertion scenario (before content, after content, etc). If the insertion logic exists, it will display all boxes that satisfy that condition.
- For example, if you create a display for the category Asia and a display for the tag Nepal, both displaying after content, Ad Inserter will show both if a post meets both conditions. If you have logics for tags of Nepal and India and a post featuring both, Ad Inserter will also show both.
- We streamlined our categories and tags to prevent display overlaps, but if you are categories/tags elsewhere you may run into issues. This may be easier said than done for some blogs.
- If you end up with multiple displays for any given post (like per the previous scenario), Ad Inserter will display them in the order at which they appear in the boxes. So content in Box 3 will appear above Box 5. So if you want a piece of content that will always appear last no matter what, I like to put that in the highest numbered boxes possible just to be safe (e.g. Box 96). Just try to remember that you did this!
- If you use Ad Inserter Pro for lazy loading features, note that some scripts may require the “load in iframe” option also enabled in order to defer (our newsletter form only works like this). For some programs, iframes will mess with the aesthetics (WP Show Posts is one of them), so if you need to enable the iframe option its best to keep that program/script/insertion in its own box.
As I've mentioned many times in this guide, using WP Show Posts and Ad Inserter to display recent posts in articles can be a fairly labor-intensive process to set up with a somewhat steep learning curve. We recommend it because Ad Inserter is quite powerful beyond this one unique scenario (once you learn it you'll likely use it for everything), and we think it is worth learning with the Related Post insertions as it is on the easier side of things.
Hopefully, the above steps will get you most of the way there in trying out settings that will make the display process easier!
If you want to display content beyond related posts after content, especially those with scripts, grabbing a license for Ad Inserter Pro is a great idea to enable the lazy load function as well. It really is our biggest secret to a blazing fast site!
Join This Week in Blogging Today
Join This Week in Blogging to receive our newsletter with blogging news, expert tips and advice, product reviews, giveaways, and more. New editions each Tuesday!
Can't wait til Tuesday? Check out our Latest Edition here!

Increase your blog's revenue with Raptive!
Add premium display advertising on your blog with Raptive- accepting blogs starting at 25,000 pageviews per month! (Additional terms may apply.)
Upgrade Your Blog to Improve Performance


Check out more of our favorite blogging products and services we use to run our sites at the previous link!
How to Build a Better Blog
Looking for advice on how to improve your blog? We've got a number of articles around site optimization, SEO, and more that you may find valuable. Check out some of the following!